Microsoft Excel is almost universally regarded as the gold standard of spreadsheet software, but most users only scratch the surface of the program’s immense capabilities.
At Hall many of us use Excel every day to analyze data from Google Analytics, site crawls, and other sources. Part of this process involves formatting raw data – for example, converting decimals to percentages, extracting product codes from URLs, or copy-pasting this data into a different preformatted sheet.
In order to avoid repeating tedious processes like these, which often require complicated formulas, every time we get a new data set, we set up macros in Excel to do the work for us.
For this example, we’ll look at the process of making a macro simply for pasting values.
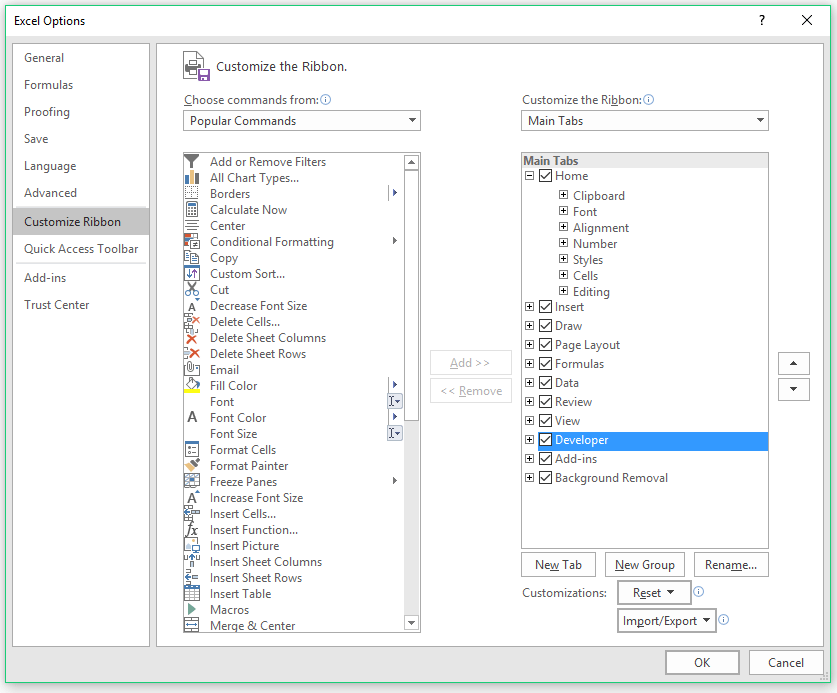
First, we need to enable the Developer tab. In Excel 2016, click File, and then Options from the left hand column. Then, choose Customize Ribbon from the menu of the window that pops up, and click the check box to add the Developer tab to the ribbon.
Now we’re ready to record a macro. To make sure the macro code only includes the actions which we want to record, we’ll select and copy a cell of data before recording. Once that’s done, click the Record Macro button on the Developer tab, and the following menu will pop up:
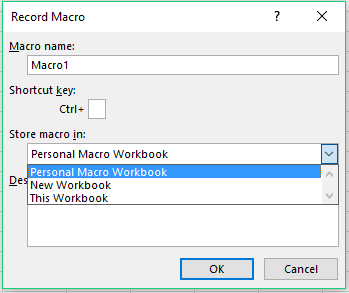
We can use this form to name the macro and assign a keyboard shortcut. Let’s name our macro PasteByVals and assign the keyboard shortcut Ctrl+Shift+V. Excel allows you to override the default bindings, but be advised that you can’t undo the execution of a macro – if you accidentally execute a macro that you assigned to a familiar shortcut, it may take some effort to fix the damage done. For this reason, it’s generally best to avoid overriding any shortcuts that you commonly use.
We also need to choose where to save the macro, usually in either This Workbook or our Personal Macro Workbook. The Personal Macro Workbook is a separate file stored locally on your computer that loads whenever you open a file in Excel. This means every macro stored here is available all of the time, regardless of the actual file you’re looking at.
Storing a macro in the workbook itself means it’s only available in that specific file, but it has the advantage of traveling with the workbook, in case we need to send it to someone else or open it on a different computer. For our example, we’ll store it in the Personal Macro Workbook. We can also include a description of what the macro does in the description field.
Now we’re ready to proceed with recording the macro itself. Click OK on the menu, then right click a cell on the spreadsheet and select the Paste Values option. Head back to the Developer tab on the ribbon and click Stop Recording. Excel will record absolutely everything we do in the program, so before we use the macro, let’s take a look at the code that was generated and see if we need to make any adjustments before we start using it. Press Alt+F11 to open up the Visual Basic for Applications Editor. Here’s what our generated code looks like:
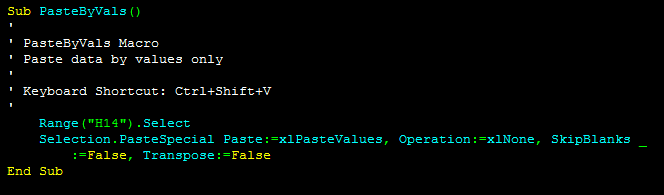
Let’s examine what Excel is doing when it executes this macro. The first line selects the cell where it will paste the data (or the top left cell for a range of cells). Unless we always want to paste in cell H14, we should delete this particular line of code from the macro. The next line is the actual pasting method, so we definitely want to keep this. We can see that this uses the built-in Range.PasteSpecial method, with various parameters that define the exact way the operation is carried out. We can reference Microsoft’s documentation of these parameters to fully customize our paste function, but this will achieve what we set out to do for this example, and it’s ready to use on this workbook or any other.
This is just one of many ways that macros can automate and improve Excel to suit your purposes. In addition to some of the ideas mentioned above, you can also record or write macros that will autofit every column of every sheet, adjust the horizontal scrollbar so you can see more worksheets on the bottom navigation, hide unneeded rows or columns, and almost anything else you can imagine.
For more information on writing your own macros look here.


 Subscribe via RSS