If your eCommerce site runs on Shopify, you have the ability to make your website stand out and align it with your brand’s identity. The good news is that you don’t need any coding knowledge to tailor a Shopify theme to your business. In this guide, we’ll walk you through the steps to access the theme editor and utilize its features.
Getting Started
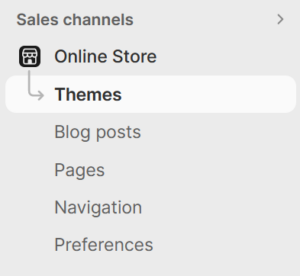 To begin customizing your Shopify theme, log in to your admin panel and select “Themes,” located beneath the link for your Online Store.
If you don’t have a theme yet, you can choose from a variety of free, prebuilt themes offered by Shopify. The Shopify Theme Store provides a wide variety of free and paid themes. Shopify’s Dawn theme is a great place to start if you don’t already have a theme in mind.
After selecting your desired theme, click the “Customize” button to access the theme editor. We recommend not editing your live theme directly to avoid any potential issues on your site. Instead, click the “∙∙∙” button next to the theme and choose “Duplicate” to create a copy that you can safely edit without affecting your live site until you’re ready.

Using the Theme Editor
The theme editor enables you to customize various aspects of your theme, including the homepage, product pages, collection pages, and more. You can modify colors, fonts, images, layout, and even add custom CSS and JavaScript code.
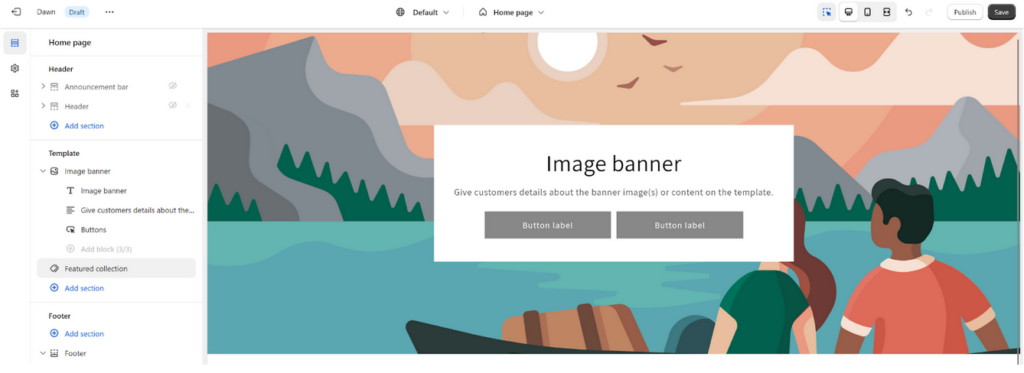
Once inside the theme editor, you’ll see a live preview of your website on the right and a sidebar on the left. The sidebar offers various customization options, and its default view is “Sections,” displaying a list of elements visible on the page, such as the header, footer, and other specific sections. You can switch between “Theme Settings” or “App Embeds” by clicking on their respective icons on the far left of the sidebar.
Add a Section to a Page
Customizing your pages with additional sections is simple. Click the “Add section” link in the left sidebar, and a searchable list of available sections will appear. For example, in the Dawn theme, you can add sections like slideshows, featured products, and contact forms. To demonstrate, I’ll add an image banner section to the theme.
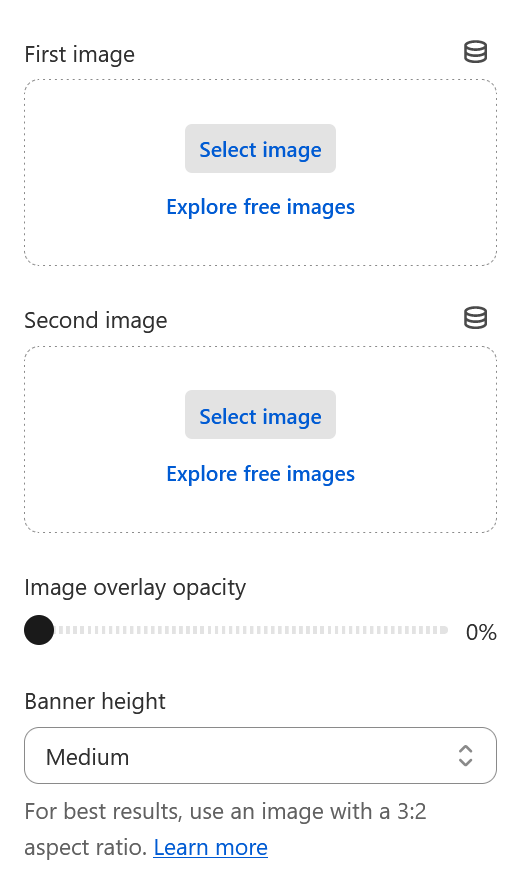 Clicking on the new section will display its specific customization options in the sidebar. For an image banner, you’ll find settings for the background image, banner size, and content alignment. Furthermore, all elements allow direct custom CSS if necessary.
You can hover over a section and click the 👁 to hide the section from the page. This is useful for seasonal sections that you want to reuse but not have on your site year-round, like a Black Friday sale. You can also click and drag the ᎒᎒ symbol that appears to reorder the sections.
The image banner has three blocks built into it: a title block, a paragraph block, and a buttons block. Blocks work like sections within a section and can be re-ordered or have their visibility toggled just like sections.
Clicking on a block will display options for that specific block. For the button block, you can customize the labels, links, and styles of the buttons. If a button label is left blank, the button will not appear on the site.
Creating a Template
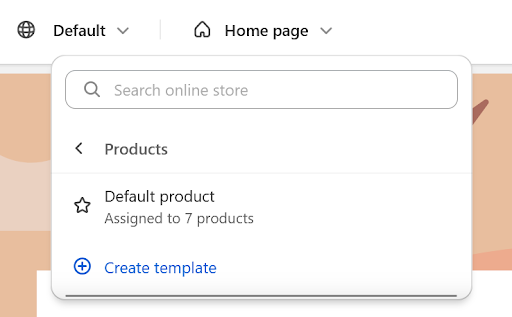
In the center of the top bar, you can change which page you would like to customize. By default, the editor starts on the site’s homepage, but you can customize any page on your site, including the product, cart, and checkout pages. You can also create a reusable template assigned to specific pages, such as products. This is handy for designing seasonal product pages or featuring special items.
Sitewide Sections and Theme Settings
You can also customize the header and footer sections on each page. Any changes you make to these sections will affect all pages, not just the page you are editing. Keep that in mind before making changes to these areas!
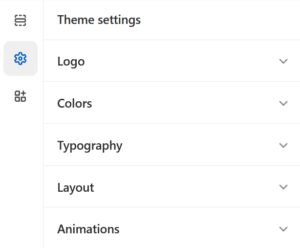 In the far left toolbar, you’ll find a gear icon that opens the theme settings. These settings impact the overall appearance of your site, including your logo, color scheme, fonts, and more. For instance, the Layout menu lets you adjust page width and grid settings, while the Inputs menu offers options for form input fields.
Finalizing Your Changes
After completing your site customizations, click “Save” and “Publish” to make your changes live. In the upper right corner, you’ll find icons to preview your site on desktop and mobile, as well as in fullscreen mode. The “Save” button ensures you don’t lose any progress, while the “Publish” button makes your new theme the live version.

Your old theme will still be available, and you can always publish it to roll back the changes if needed.
Conclusion
Using the Shopify theme editor is an intuitive and user-friendly way to customize your online store without any coding knowledge. Experiment with various settings, colors, and layouts until you achieve the perfect look for your brand. The theme editor provides you with significant flexibility, but for more advanced customizations, contact the experts at Hall.