The Problem
Image quality vs. performance is a constant tradeoff that developers have faced since the early web. We all want beautiful large imagery that creates immersive multimedia experiences for our website users, but this comes at a significant cost. Not only do heavy image files lead to a slow/disjointed user experience leading to lower user interaction and higher bounce rates (Amazon ran a study in 2012 claiming that adding one second to their page load times could have cost them as much as $1.6 billion in sales that year), but Google has expressly told us that site speed is an important ranking factor in its search results.
So, how big of an impact on site speed can image optimization have? In short, an enormous impact. Among the top 100 websites on the internet, images make up over 42% of page overhead. The problem gets worse as we expand that selection to include all sites that make up the web.
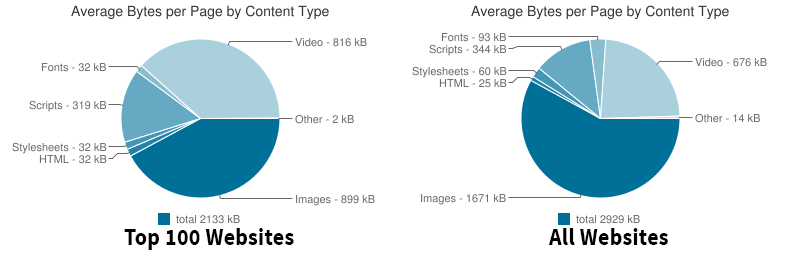
Why the difference? Sites among the internet’s top 100 have dedicated dev and content teams that know the importance of optimization, whereas the average website manager may not know the impact of uploading the latest photo straight off their iPhone to their website. Regardless, the opportunity is clear; at roughly 40% – 60% of your page resources even a modest dent is going to mean an impactful performance improvement.
How To Optimize Your Images
1. Choose the right file format for the job.
I previously touched on some of the most common file formats, but here I’ll focus on the four that pertain to web images and their best uses:
- JPG or JPEG – JPGs are the most commonly used file format for serving web images. It is a lossy format meaning that during compression some data is lost. The idea is that the algorithm used to compress is meant to take advantage of flaws in our perception to discard information that we have a hard time noticing. JPGs are best used for images with many colors, especially photographs, where other formats would result in large file sizes.
- PNG – This file format has been around almost as long as the jpg and comes with a few extra features. For starters, PNGs are lossless files meaning that no detail is lost during compression. PNGs also have the ability to include transparent or semitransparent pixels. PNGs are best used for images with fewer colors or where transparency is important, such as logos and icons.
- GIF – Though similar to PNG in features, GIFs have one primary advantage to any of the file formats mentioned here, animation. Take a look over at giphy.com for a few examples of why animated GIFs have exploded on the internet over the last decade.

An animated GIF lifted off of Hall’s first website in 2000. GIFs are best used when animation is a must or for great one line responses over interoffice chat.
- SVG – Unlike the formats above, SVG is a vector file format. Rather than saving pixel location and color, SVGs use algorithms to draw the image each time they load. This has the unique advantage of being able to scale to any size while still looking crisp and pixel perfect. Unfortunately, the SVG file format is not currently supported by WordPress core. SVGs are best used for logos, icons, illustrations, and unique animations but are not currently supported by WordPress.
2. Resize images for the web.
One of the nifty things WordPress does for us behind the scenes is creating thumbnails of uploaded images to be served to users. These come in thumbnail, medium, and large, and the result is that users only end up being served the smallest possible format based on their screen size and page constraints.
This takes some of the risk out of uploading large (PX x PX) files to your WordPress site, but you can still improve the process by only uploading images at the largest size that they will be served on your site. If you’re uploading an image that is intended to be small you can improve speed and save server space by only uploading it at its maximum size.
3. Compress images before they’re served.
Compressing your images is in many cases the number one thing you can do to improve site speed. It works by removing data from images while hopefully producing a similar result to the original. There are several ways to implement compression for your WordPress site and I’ll cover just a few that we use here at Hall.
Paid tools like Adobe Photoshop and Affinity Photo offer tons of compression options and fine grained controls. In the hands of an experienced user these tools can dramatically decrease file sizes on export.
Free web tools also exist for this purpose. Sites like TinyPNG and JPEG Mini allow you to upload your images to their site, compress, and download them for upload to your website. They lack some of the options provided by the tools above, but they offer an easy and free first step for image optimization.
Don’t have control over all the images uploaded to your WordPress site? Not to worry, there are several plugins available that automatically compress images in real time as they’re uploaded. Many of these plugins will also go through your entire image gallery and apply compression in bulk. That means even if you haven’t been following best practices to date, you don’t have to download, compress, and re-upload all your site’s images.