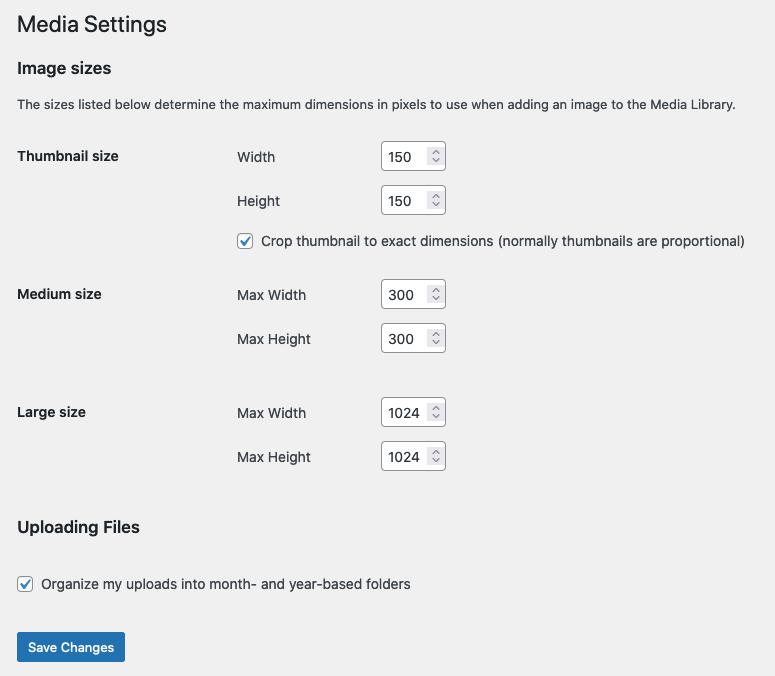
By default, WordPress automatically takes images uploaded to the media library and generates additional sizes of your image: thumbnail, medium, and large, with the option to add custom sizes. While you can edit those sizes in Settings->Media, as you develop your theme, you’ll surely create components that utilize images at specific sizes.
The sizes of the default images are:
- Thumbnail: 150px by 150px, cropped
- Medium: 300px by 300px, uncropped
- Large: 1,024px by 1,024px, uncropped
If you were building a real estate website, you might include images of the property, floor plans, and a headshot of the agent on an individual property page. Creating individual image sizes for each would allow you to load exactly the size you need for each.
If your component displays an image at a size different from the preset options, instinct might be to choose between the two images which are smaller and larger than you need. Using the smaller option will load faster, but look pixelated. Using the larger option will look great, but the page will take longer to load than necessary, as unused extra pixels will need to load as well.
The proper technique is to create your own custom image sizes so you can load the exact image size you need.
Add a new custom image size with the add_image_size() function to your theme’s functions file.
The function takes four parameters: name, width, height, and crop.
- Name: The name you provide will be used for the new custom image size in your template files.
- Width: The width, in pixels, of your new image size.
- Height: The height, in pixels, of your new image size.
- Crop: Sets whether the image should be cropped to the exact dimensions you set above, or if it should keep the ratio of your original upload and treat the height and width dimensions as maximums.
add_image_size( ‘my_new_size’, 600, 450, false );
After you create your new image size or change the size of the default image sizes, newly uploaded images will be created at those sizes, but you’ll need to regenerate previously-uploaded images. The Regenerate Thumbnails plugin is a popular tool for that. It can also be done through the WP-CLI command, wp media generate.
To utilize these new image sizes, echo the wp_get_attachment_image() function.
The function takes four parameters: attachment ID, size, icon, and attributes.
- Attachment ID: The ID of the image you are displaying.
- Size: The name of the image size to display. Ex:
mediumormy_new_size. - Icon: Whether the image should be treated as an icon. Default is false.
- Attributes: If needed, pass along a string or array of additional attributes for the
<img>tag. A common use is to add a specific class.
echo wp_get_attachment_image( ‘your_image_id’, ‘my_new_size’ );
While in “the loop,” you can pull the featured image of the current post using the_post_thumbail() and supply your new image size.
A major advantage of properly adding images to your templates with the functions above, instead of getting a URL of your image and manually creating an <img> tag yourself, is responsiveness.
When WordPress creates the <img> tag, it looks for the available image sizes and creates srcset and sizes attributes to enable browsers to load the right size it needs at different screen sizes, instead of just loading the image size you note at all sizes.
A key thing to note is that only images that aren’t set to do a “hard crop” (where part of an uploaded image will get cropped if it’s not the same width/height ratio as you’ve set) will be used to list the responsive image sizes. This ensures the user sees the same content at every size, and not a different crop at a different size. The default setting is false when adding a new image size.
Properly using custom image sizes in your theme will keep large images from slowing down your site, while keeping your images crisp and consistent.