A common requirement in many WordPress sites that have large amounts of content is the ability to filter that content. Whether it be blog posts, products, or custom post types—filtering allows users to further specify what they want and receive the best information possible for their unique experience. While there are many great plugins out there for filtering your content, sometimes you need something more custom that can handle your specific use case. For that, you can build your own setup for filtering using PHP templates, custom JavaScript functions, and just a little bit of CSS styling.
The Filterable Content
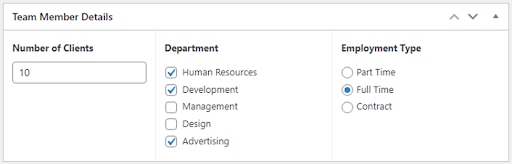
A good application for building your own filtering functionality is when your site uses the Advanced Custom Fields plugin in combination with a custom post type. Let’s say you have a custom post type for all of the team members at your company and you’ve added details about each team member using the Advanced Custom Fields plugin. That might look something like the following, where you assign each team member a number of clients, the departments they belong to, and their employment type.
Now that you have all of this information about each team member, what can you do with it? The cool thing about building your own custom filtering functionality is that you can really do just about anything! Let’s start with setting up the framework for filtering. Going forward, it will be assumed that you have some basic knowledge of using WordPress templates and WP_Query loops so that you can focus on the more relevant details.
Getting Your Content Ready to Filter
Start inside a loop for the team members custom post type. This can be done with a manual query in a custom page template such as below, or by using the custom post type’s archive template page.
$team_members = new WP_Query( array( 'post_type' => 'team-member' ) );
if ( $team_members->have_posts() ) : ?>
     <div class="team-members-list">
     <?php while ( $team_members->have_posts() ) :
          $team_members->the_post();
Now, as you loop through each of your team member posts, you will need to add something to each post so that it can be easily identified for the purposes of filtering. To do that, use custom filter classes. To create the filter classes, get all of the data from your custom fields and create classes with easily identifiable prefixes while appending the data to the end of each class.
- For the number of clients, we append the number to the end of the
number-of-clients-string. - For departments, we append each department name to the end of the
department-string. - For employment type, we append the employment type name to the end of the
employment-type-string.
This method allows you to add as many identifying classes as necessary to each post and it will make it much easier for you to filter those posts later on.
$filter_classes = array();
if ( $number_of_clients = get_field( 'number_of_clients' ) ) {
     $filter_classes[] = 'number-of-clients-' . $number_of_clients;
}
$departments = get_field( 'department' );
if ( ! empty( $departments ) ) {
     foreach( $departments as $department ) {
          $filter_classes[] = 'department-' . $department['value'];
     }
}
if ( $employment_type = get_field( 'employment_type' ) ) {
     $filter_classes[] = 'employment-type-' . $employment_type['value'];
}
$filter_classes = implode( ' ', $filter_classes );
Next, simply add the classes to the element that you’re using to display each team member so that they will be available for filtering.
<div class="team-member <?php echo esc_attr( $filter_classes ); ?>">Setting Up Your Filters
Now let’s get into how to filter the team members. As mentioned above, you will start with just a basic query of all of the team member posts. Then, you add specific classes to each post based on the data available in the custom fields. So, to filter these posts, you can simply check what classes are on each post and hide or show the post depending on the class. To accomplish this, you will just need to set up a basic JavaScript function, a select element for choosing a filter value, and a custom class .hide-team-member that will be used to hide a team member entry using CSS.
.hide-team-member {
     display: none;
}
For filtering by department, you can use a select element with all of the available department values.
<label for="team-member-filter-department">Department</label>
<select name="team-member-filter-department" id="team-member-filter-department">
     <option value="human_resources">Human Resources</option>
     <option value="development">Development</option>
     <option value="management">Management</option>
     <option value="design">Design</option>
     <option value="advertising">Advertising</option>
</select>
Filtering with JavaScript
Now you can set up a JavaScript function that is triggered every time a new filter value is selected. With this filtering function, you take the value from the department filter and check each team member to see if it has a matching filter class. If it does not have a matching filter class, simply hide the team member by adding the .hide-team-member class to it. Also make sure to remove the .hide-team-member class at the beginning of the function so that the filtering results are reset with each change. Similar filtering elements and JavaScript methods can be created for any of the other custom fields that are assigned to your team member.
$("select#team-member-filter-department").change(function() {
     filterTeamMembersByDepartment($(this).val());
});
function filterTeamMembersByDepartment(filterBy) {
     var $team_container = $('.team-members-list'),
          $team_members = $team_container.children('.team-member');

     // Reset the filters.
     $team_members.removeClass('hide-team-member');

     // Hide all Team Members that are not in the selected department.
     $team_members.not("[class*='department-" + filterBy + "']").addClass('hide-team-member');
}
Time to Filter!
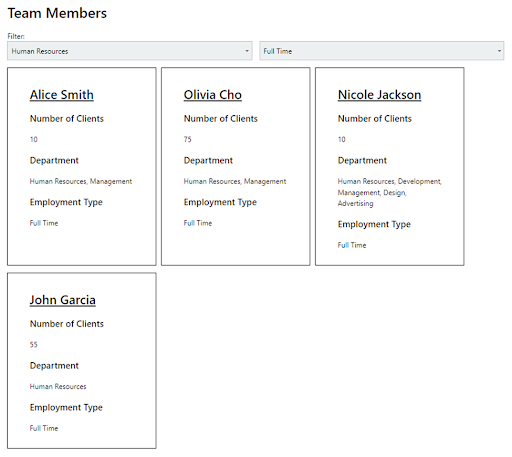
When you are all done, the final results might look something like this. Here you can see the team members filtered by the Human Resources department and Full Time employment.
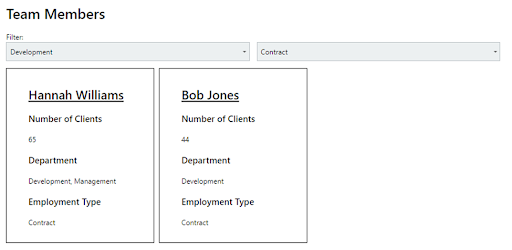
Another filtering result for Development employees that work as Contractors might look like this.
This is merely a brief example of what you can accomplish by writing your own logic for filtering your custom post types based on their custom field data. There is nothing stopping you from writing much more complex filtering logic that is entirely specific to your individual use case. You can even extend this functionality out to include logic for sorting your posts. The possibilities are endless once you create the framework for filtering your results, and it’s often just a matter of updating your filtering functions in JavaScript for whatever purposes you need. For more assistance customizing your WordPress site to work for your business, contact the web development experts at Hall.